

Rasyad
-
Posts
70 -
Joined
-
Last visited
Posts posted by Rasyad
-
-
Here is the project completed...(for now)...details to follow.....
Rasyad
-
I contacted Troy at ATI (Advanced Technology International) and he was able to find me a tool, Wow, what a great company to deal with.
Rasyad
-
Rtired,
Thanks, I am a few weeks out before everything is ready for coating and then assembly. Will PM as needed.
Rasyad
-
I am doing a custom project that involves an ATI pistol grip and telescoping stock. I need to locate the tool for installing the pistol grip nut. It looks like an AR15 buttstock nut but is inset into the grip so the normal spanner won't work.
Any thoughts from those that have installed the ATI pistol grip?
Thanks,
Rasyad
-
Funny, I converted my LMT308MWS to the Elfman push button safety and will never go back. HERE
Rasyad
-
SOLD here in CA.
Thanks,
Rasyad
-
Interesting thought, I do use Federal's Flite-Control and could see how the stuff might blow into the comp. I guess the same might be true with ports. That said, I do own a Bridgeport and know how to use it. I would be curious if to know what folks have done with ports and how well it works on an M4. While I could mill the ports easy enough, I have no idea about size or port design considerations.
Rasyad
-
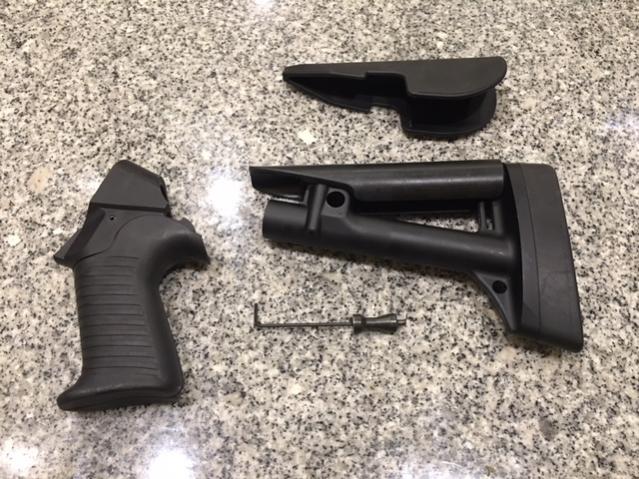
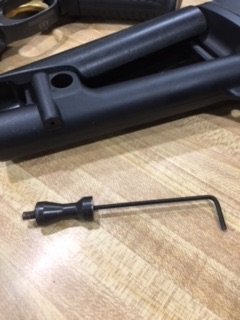
I am building a custom stock out of Raven ATI parts and no longer need the factory telescoping stock. I replaced the OEM spring button and fabricated an adjustable fixed length button with internal set screw to lock the length in the standard positions. Hex key will be included. As well I fabricated a custom delrin cheek rest. The stock rest is also included.
How about $SOLD with free shipping USPS priority domestic?
Thanks,
Rasyad
-
Just curious if there is an effective screw in compensator for the M4. I am well into a custom project and wanted to look at and test before getting everything cerakoted. I am looking for flatter shooting and help staying on target, not so much for recoil reduction.
Look forward to your thoughts...
Rasyad
-
Thanks for posting. I like the Federal 00 flight wad rounds as well as the FW slugs.
Rasyad
-
Thanks for the report and nice shooting.
Rasyad
-
Pm inbound.
Rasyad
-
Nice.
Rasyad
-
I have an OEM 2 round extension if you are interested. Rasyad
-
I really like the new telescoping stock, charging handle, and forend. How might we get these parts here? http://www.benellidefence.it/products/m4-14-door-breacher
-
Nope, not allowed unless you want to register it as an assualt weapon. Rasyad
-
I have a CC&G which seems fine. The point for me would be the Carrier Comp design, a heat treated steel shaft press fit / bonded to a knurled Ti cylinder. My 2 cents, Rasyad
-
Congradulations, I would have to move out of California to get an SBS. May move someday but family and surf are all here.
Well Done,
Rasyad
-
So you already had the Briley trigger, it was working fine, and you transferred that over to the A&S?
Yes, I already had a Briley Trigger set, installed by Briley in my stock aluminum trigger guard and it worked perfectly. I then transfered the trigger group to the A&S triggerguard, worked on the fit of the Briley Hammer in the A&S hammer channel and now it works perfectly.
Rasyad
-
Is this with the A&S Guard?
Yep
Rasyad
-
I have a Briley trigger set and the hammer fit was way too tight in the hammer channel of the triggerguard. The parts assembled but did not function. As a quick fix I used lapping compound and worked the two parts by hand until the fit was nice and smooth. I have some concern that the fit is still too tight for dirty combat conditions and I plan to widen the channel on the mill next time I have it apart. and before any re-coating for color.
Rasyad
-
Cerakote sniper gray is really close.
Rasyad
-
Nice, I like yours better, much simpler design! Yep, very hard steel that button is.
Thanks,
Rasyad
-
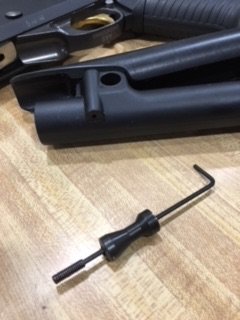
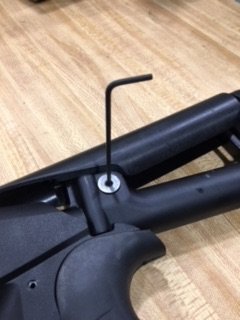
Here is one way to convert a telescoping stock to a fix position stock.
1, Punch out the longitudinal spring pin that retains the stock release button, save the pin and spring and button.
2, Drill all the way through with a 1/8 in drill. I used a lathe to make sure I held center.
3, Install a 6/32 thread insert. It has been a while but as I recall I had to also drill and tap for the 6/32 insert.
4, Trim the 6/32 set screw length to 0.56in.
4, Reassemble without spring or retaining spring pin, select desired position and extend set screw to lock in place.
I also turned town the button to be flush with the side of the stock but this was an optional detail along with the custom delrin cheeck rest. If I keep this stock the button will get cerakote to match the rest of the parts. I am just started work on a custom stock design using the ATI Raven grip and buffer tube. If the new stock works out this OEM stock will become available.
Rasyad
Birthday Benelli M4
in Benelli
Posted · Edited by Rasyad
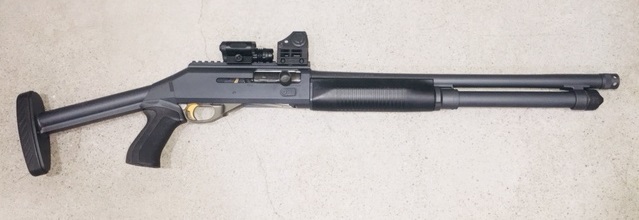
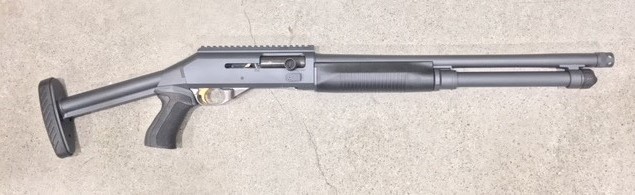
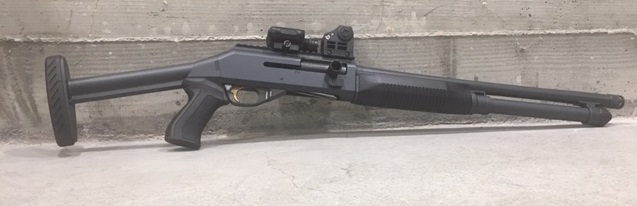
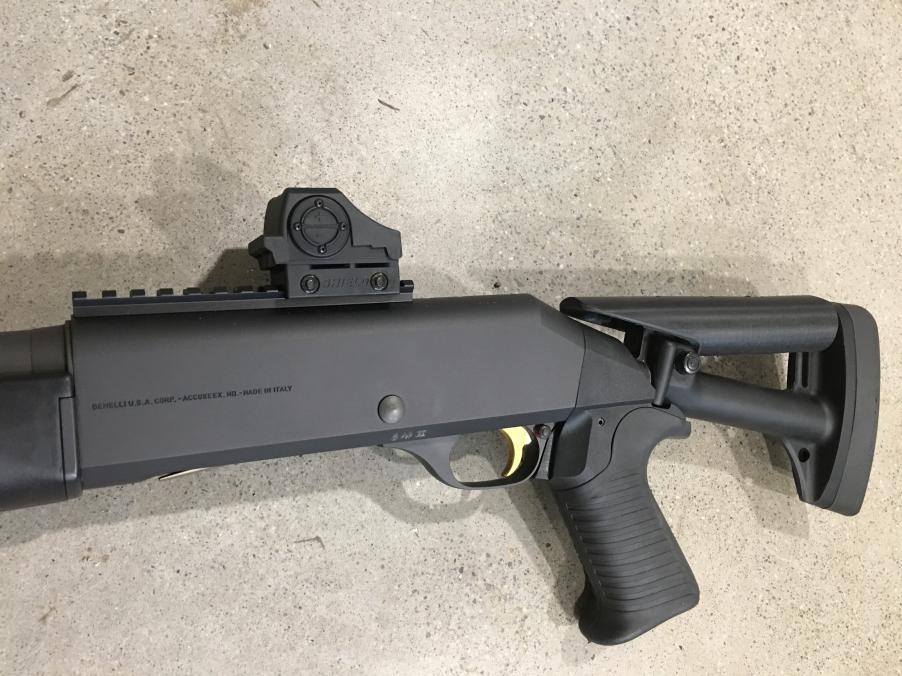
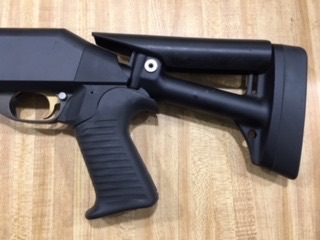
By way of background, here in California semi-automatic shotguns like the M4 must have fixed stocks and 18" barrels. Working within these constraints my goal was to create a minimalist design optimized for my dwarf like body and squared of stance in a home defense / CQB role. Previous experimentation with an OEM collapsible stock helped me discover the appropriate LOP and Drop for my physical build and purpose. Range time and training will be needed to see if i got it right.
Anyhow, the details.
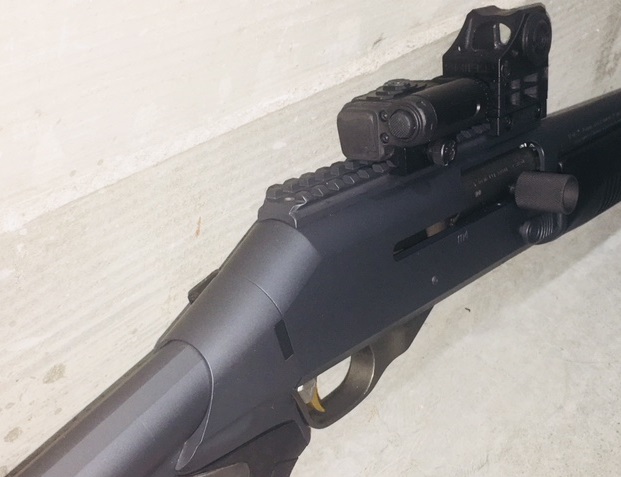
1. Debrazed the front iron sight and smoothed re-coated the barrel.
2. Removed the OEM rear sight and picatinny rail.
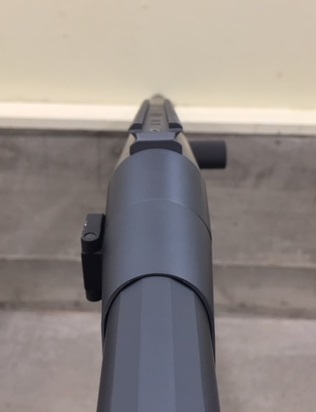
3. I did a ton of research and talked with several companies to try to get a full length rail made for the M4, all to no avail. So I built it myself using a Night force gunsmith rail blank. The NF profile I used allowed the full width contact radius with the receiver I was looking for. I milled the bottom mating radius on the rail section with a 1.5" ball end mill and then hand lapped the rail to the receiver. I then cut to length and shaped the rear rail section and de-horned to eliminate all sharp corners. I carfully indexed the receiver to map out the hole locations using a center finder and the digital readout on the mill. I then then drilled and counter bored the new rail to utilize the 5 OEM picatinny rail screws and drilled and taped for the two OEM rear sight screws. For those that have had occasion to remove a rear sight you will have noticed there is a third hole in the receiver between the two countersunk holes used to mount the rear sight. I purchased an additional rear sight screw and lock washer from Midwest Industries for this third hole. To furthur complicate the task it turns out that Benelli uses some kind of odd metric countersink for all these screws so I had to have them custom ground. Fortuantely, I have a great source here in Oakland. If anyone needs these cutters I would be happy to loan them out.
4, Installed the ATI pistol grip.
5, Fabricated a short LOP fixed stock by welding together the ATI buffer tube, butt plate and end cap. I actually had to mill the butt plate to allow the buffer tube to pass through the plate before welding. I then used JB weld to fill the bottom channel and holes in the buffer tube (used for telescoping) and fill the recesses in the butt plate. I then fillited and faired the surfaces. In hindsight I should have just fabricated my own butt plate as this would have saved a bunch of filling and fairing. It is worth noting that the ATI parts are absolutely top quality.
5. Sniper gray Cerakote by LEO Arms in Concord.
6. I am still torn about the odd color of my first generation A&S trigger guard. I like the durability and function of the anodizing and so did not want to Cerakote this part. I am going to shoot the thing for a while before deciding what I might do about the poor color match.
7. The big benefit of the custom full length rail is the flexibility with regard to optics. Shown is a Shield SIS sight with a UTG Bull Dot Green laser just behind. The laser projects a huge dot through the mount of the Shield sight that is bright enough illuminate and identify a target in a fully dark room. Looking through the Shield sight you see both the circle of red dots of the Shield sight and the huge green dot of the laser. Testing will determine if the UTG laser holds up to the M4 recoil abuse.
Thanks for looking,
Rasyad