

shootingsight
-
Posts
64 -
Joined
-
Last visited
-
Days Won
9
Posts posted by shootingsight
-
-
I do not have the pistol grip stock, but it looks like the answer is to poke holes in the butt-pad to unscrew stuff. I do want to put a Tail-Hook on it, so I need a buffer tube.
Got the bolt sorted. You need to take the charging handle AND the firing pin out. I tried each, but not together ?
Also, I fitted the 2-stage trigger, and it worked great, so I want to get that promoted. If you are firing slugs and want accuracy, 2-stage is the way to go.
-
I made a 2-stage for an M4, though only a few are in the wild with little feedback, Pretty rare that you care about a crisp letoff for a shotgun.
-
I'm in! Bought my gun today. Gotta figure out how to get the stock off. Spent 5 mins and could not get the bolt apart - I got the firing pin, cam pin, and charging handle out .... now I'm gonna have to read the instructions ?
Thanks for all the help.
-
LOL. You might be giving too much credit to the engineering budget of companies. I spent my career in a Fortune 100 company doing R&D, and we did what you think: if there is a doubt as to strength, you get 10 units (or 100), and you smack them with a drop test or multiple recoils until they break .... because you can afford that. Smaller companies will take one, try it out and if it does not break right away, they call it good. Dunno how big Scalarworks is or what they did, but I'd question how many receivers they were willing to destroy to confirm their design.
That said, your thought about butting the rail up against something makes a lot of sense, and is a freebie.
-
Counting on wicking might be touchy. The shear strength of loctite is a function of square inches of contact area. It does not have to be thick, indeed, for most adhesives, thinner is better, but you want big contact area. So I'd be generous in the application. Typically, I use green loctite, which is exactly designed to wick into cracks, and it is billed as being designed for application to screws after assembly, so the capillary action pulls it in. I don't trust this and generally apply it before assembly. Just beware that it comes in several varieties with differing setup speeds. For some, you only have a few minutes to complete assembly. Green is stronger than blue, but isn't permanent. With a few seconds from a blowtorch, it will loosen up.
-
8 minutes ago, shootingsight said:
For some reason, it locked me out as I was editing, so here is a repost with my thought in reason #1 completed.
AAAHAHAHAHAHA! I've been making triggers for 15 years now, and have been active on dozens of forums, corresponding to the various platforms I was working on. It's been quite a few years since the name Amsdorf was mentioned. Thanks for a good laugh to start the day. What a clown.
As to this discussion, the term 'shear' is based on the notion of two parallel planes moving relative to each other. For the system to fail in true shear, with the shear planes touching, you would expect the threads of the mounting screws to still be in the receiver, and the top of the screw still in the rail. However this is not what has been reported as the failure mode. Instead, we are talking about threads stripped out of the receiver and receiver holes elongated. To get this failure, you need upwards/bending load on the threads, even though recoil load is backwards.
I can think of two ways to make this happen:
1. If the screws are loose. The resistance of the rail sliding on the receiver is the friction between the two. Friction is of course a function of normal force. So the function of the screws is not to prevent slipping of the rail versus the receiver, but to provide the normal force so the receiver and rail do not slide relative to one another. Loose screws means the normal force is reduced, and sliding will start, creating a bending force on the screws, which concentrates force on the top edge of the threaded hole.
2. If the screws were overtightened in the first place, causing the onset of failure in the aluminum threads prior to recoil.
Both of these failure modes would be accelerated by a heavier optic.
Net I think this sort of failure has several factors as its root cause: a heavy optic, plus improper installation. One or the other alone might not cause it.
Me personally, after reading this, I'd add loctite on the surface between the rail and the receiver before tightening the screws. Loctite is designed to increase the shear strength between materials, usually between a bolt and a tapped hole, but it should also work between a rail and the receiver.
-
Thanks for all, it sounds like I'm going the route of just getting a black gun.
I've got a plan for charging handles.
We'll see what else I can see that I want to play with.
-
NP3 will not perform on the hammer. This is why I chose NiB for the 922R hammers I make. Teflon is too soft to take much direct load, and at the sear edges, the pressure is immense - right up at the yield point of the steel. So making trigger components with Nickel-teflon, they start to gum up very quickly. The teflon can't take the load, so you get nickel bearing on nickel, or Nickel on steel, depending on it both components are coated, and nickel is soft, and it is a poor bearing surface. So the nickel starts to gall and wear away and the trigger feels cruddy.
NiB is low friction and very high hardness, so it is a great anti-wear coating for high load parts.
NP3 will perform well in things like slides and bolt carriers, where sideways forces are incidental and can be spread over large bearing surfaces.
-
Looking to buy an M4, and it looks like there are two choices:
Pistol grip or not, or collapsing stock.
H2O or not, for an additional $200
So what is H2O? If I understand, Benelli used to make an NP3 coated gun, but now just uses a silver colored cerakote. So if I buy a new H2O, all I'm getting is silver paint for $200, or does the H2O package include any other benefit?
Follow up - was the NP3 really a benefit, and I should look for a used gun, or was it merely marketing smoke/mirrors to try and get around 922, and I should save my money and stick with black?
And what's up with brown and camo guns I see? Are those custom jobs, or discontinued? Nothing on the Benelli site.
Thanks,
Art
-
Without knowing this gun, there are three reasons I can think of for this:
1. The firing pin is jammed forward. Either it is peened and jammed in the hole, or there is carbon or crud buildup in the hole. Net, the protruding firing pin hot the primer as the bolt closed.
2. Firing pin momentum. Dunno if this gun has a firing pin return spring, but if the bolt closed fast enough, the momentum of the firing pin can carry it forward. It's not unusual to see a small dimple in the primer on an M1 or an AR-15, because they do not have a return spring on the firing pin. That said, it is rare to hear of a slam fire.
3. Hammer follow. For some reason, the sear did not catch the hammer when the bolt closed, so the hammer started to swing as the bolt was closing.
Whatever the cause, if it ignited the case prior to the bolt being closed, I imagine it could swell the base of the uncontained case, which is why extraction was difficult.
-
Here it is with a first grip. I had 45 min till I was required for Family Dinner, so I banged out a handle.

-
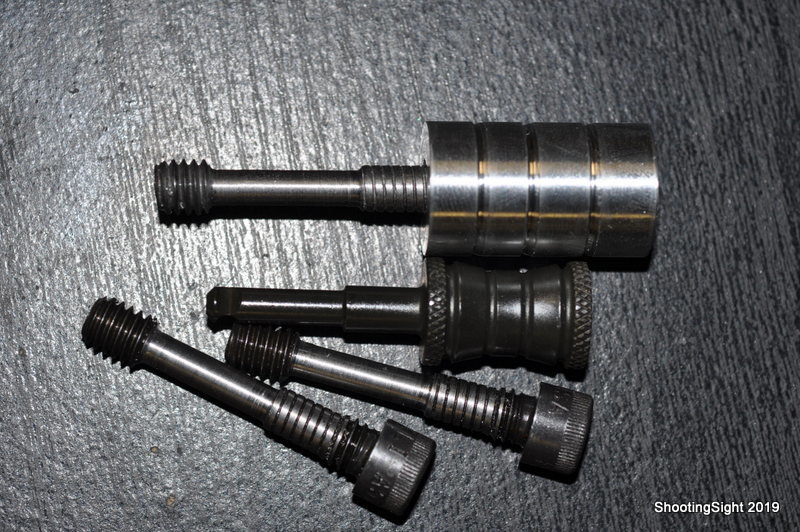
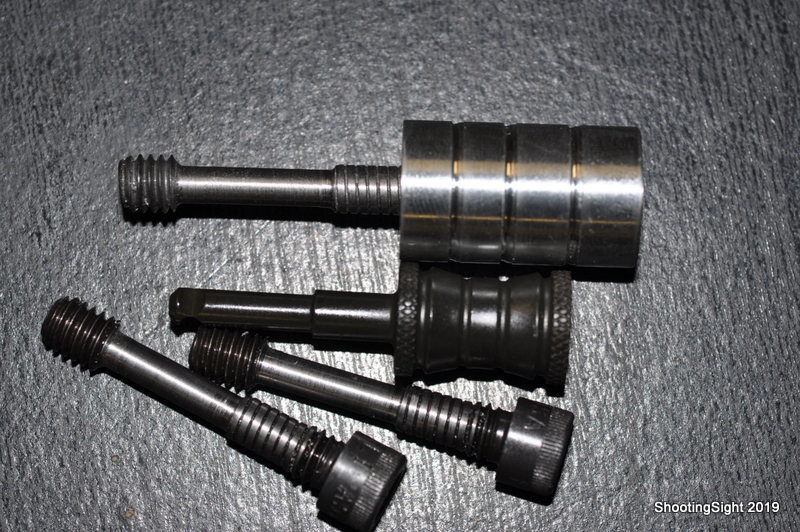
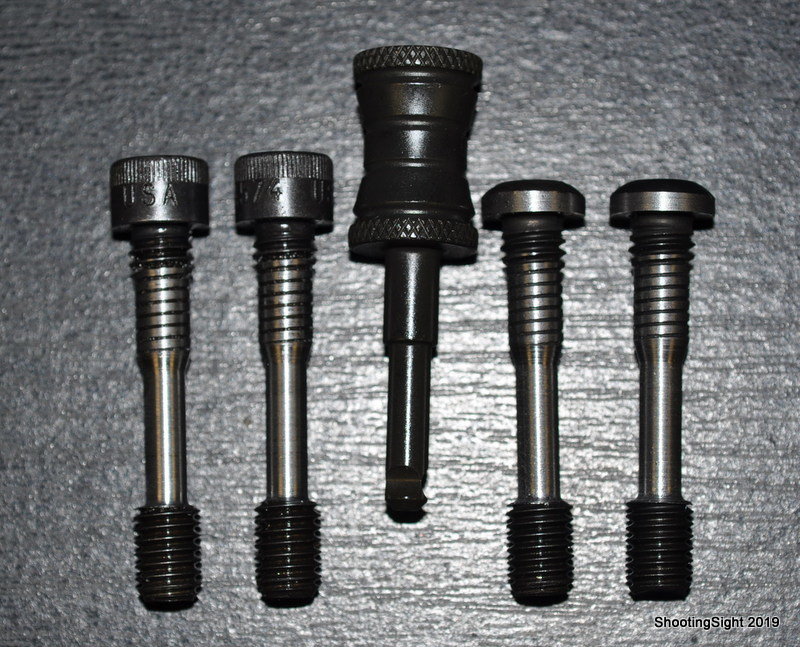
So here is what I'm playing with so far. I got Grade 8 alloy bolts, which I'm turning down so they have 1/4" of thread, and then are a shaft. Thought is I'll turn 3/4" hollow aluminum handles that are cup shaped on the CNC lathe, so these alloy bolts will thread through from the inside, and I'll have alloy steel shafts with aluminum handles. People who want weight savings, or want anodized colors, can get it without sacrificing the strength of the shaft.
I had hoped that the larger diameter would get down to the thread base, and it didn't, so it looks a little amateurish (which is fine, because I'm not being paid to do this). I'm not going to worry for these prototypes. I might make a few where I just go a little deeper, to clean it up. Ultimately, I'll do the shafts on a screw machine, so they look decent.
I'll dress a grinding wheel to create the radiused cut, and add the 3 cuts on a surface grinder.
The head of these bolts is 1/2", so I have 7075 bar that is 3/4". 1/2" hole in one end means it will have 1/8" walls, so I can add a few grooves, or a slight hourglass cut. or maybe some knurling. If anyone has ideas for what they would like to see and/or can sketch it up, post a picture or just describe your ideas, I might be able to try them out.
-
LOL. From Bud's:
"Thank you for contacting us here at Budsgunshop.com! We greatly appreciate your patronage. Unfortunately, we would not be able to honor an older price."
No worries, a used one will pop up sooner or later.
-
Where did you find it? I looked at Bud's and they are $1800 for the black, $2000 for the H2O, same as all other places I looked.
-
Thanks. Never shopped at Bud's, maybe now is the time to start.
-
I'm looking at getting some Grade 8 bolts and throwing them on a grinder, so I can make shafts for the charging handle that have a head and a short threaded section. That way, I can turn different handles in 1/2", or 3/4" or plastic or steel or aluminum, and they'll screw on and still have a steel shaft. My issue is that I don't own an M4 to test with, and I'm pretty sure I'm never going to sell enough charging handles to make $1800 to pay for one, so R&D will be interesting ?
-
Maybe I'm misunderstanding the question. I make a version of the hammer that makes the fire control be a 2-stage. Nothing else in the FCG is changed, it is only the design of the hammer I modified to convert it into a 2-stage. So in both cases, all you do is drop in a replacement hammer, but I have a 1-stage hammer and a 2-stage design.
I'll look for Stranger Danger to post detailed results himself. He only shot the 1-stage, but was unable to outrun it.
-
The OEM and my hammer are both a single stage, so that is just a single part swap in your trigger group. If you want a complete trigger group, that goes for around $300, so you could just buy that and swap in the hammer. It's only a 3 minute swap. I'll be posting a video on how to do it.
-
I sent a prototype to Stranger Danger two weeks ago, but have not heard back since. So the answer is no, I have only dry fired in a couple of trigger groups that I own.
-
I have completed the first batch of 922(r) compliant hammers for the M4 (though I think that also fits the M1, M2, M3). These are rolled plate tool steel, wire EDM cut, and NiB coated for smoothness. laser engraved to identify them as US made. Price is $85 with free delivery.
These are not 'exact' copies of the factory. There were two issues I saw with OEM that I addressed:
1. When cocked with my finger off the trigger, the hammer could hang up on the trigger body before the sears came fully into contact. I'll make a video, but it meant there was a click when you touched the trigger, as the hammer popped fully into position. I fixed that.
2. When dry cycling, I got the hammer to drop as it was resetting. It only happened once or twice, but I added a little meat to the sear to make the handoff more reliable.As mentioned above, I added NiB coating, which smooths pull and might reduce pull weight slightly - though I have not measured how much.
Also, I've come up with a version that makes it into a 2-stage trigger. At this stage, pull weight is slightly higher, though this is a work in progress as I explore if there is a demand, and how custom springs can remedy it. 2-stage is typically not sought after in shotgun. I don't think it will reduce effectiveness, but it might not be a benefit, so we'll see.
-
 2
2
-
-
No compelling argument other than the 922R. Frankly, the only reason I started this was a request for someone who wanted a 922R hammer, and I figured that banging out an exact copy of the OEM was an easy enough job. I learned quickly that it wasn't and I tweeked a couple of my dimensions. As stated, I saw issues with a factory hammer where the trigger could hang when it was cocked, and I did get the hammer to drop when I was trying to reset the trigger once, so I massaged sear sizes to eliminate both those problems.
I added NiB coating, just because it makes everything slide nicer, and mine are more precise because they are wire EDM cut, versus stamped out sheet metal (not sure that does anything though). And I made a 2-stage just to see what people thought.
Bottom line, if you do not need 922R, I don't think my hammer offers upgrades that cost justify replacing a factory hammer, unless you have had issues with following or with the hammer hangup. However if you do need 922R, I hope that the minor updates I made (plus having them in stock) will tip the consumer choice towards my hammer over other 922R offerings that either have issues, or are not in stock.
As to all the concern about criticality of hammer and the doom and gloom about working on a trigger group, I make entire trigger hammer assemblies for semi-auto rifles that are adjustable match grade. This little hammer is way less complex. It is literally just a single part swap.
-
The OP started by posting that he had a collapsible stock and a magazine tube, so for him it is 4 parts, isn't it?
-
I'm about to start selling 922R compliant hammers for the M4 next week.
At issue is that according to 18 U.S. Code § 922 (r), you may not assemble a non-sporting shotgun that contains more than 10 of a list of foreign made parts. The M4 with a 5 round tube is considered a sporting shotgun, and is exempt from the 10 part limit. If you make it a 7 round tube, it is no longer 'sporting' and you need to reduce the foreign part count by 4.
US made tube is one, follower is another, collapsible stock is a third .... many shooters find the best option is replacing the hammer with a US made hammer for #4, to keep you legal. This is why I started looking into making them. Trigger mods are typically not made to improve the function any way, not to improve accuracy, but merely to replace a foreign part with a US one to keep you in compliance with the law. So to that end, I will be selling USA made hammers by next week. They just got back from the NiB coater today, so all I need to do is add the laser engraving for USA made.
Of course, while I was at it, I did fiddle with the design just a little. I noticed in the two metal trigger groups I own that if you cock it with your finger off the trigger, the hammer can actually hang up on the trigger, slightly before it fully engages the sear, so you get a slight (and unnerving) 'click' when you touch the trigger as the hammer snaps fully into engagement on the sear. This does not happen when the hammer is caught by the disconnector and resets, only if you cock it with your finger off the trigger. The second thing I noticed (and heard from other people as well), that the factory hammer can sometimes follow. So I tweeked the geometry and think I have eliminated both those issues. Finally, all my hammers are NiB coated, because NiB makes the trigger pull smoother.
OK, one more, I designed a variant that makes it a 2-stage trigger. I only made a dozen of this version, because I get it that shotguns do not live for precision triggers, though I did get a suggestion that it would help when shooting slugs. So I call this development a case of throwing something at the wall and seeing if it sticks. You'll never know if something is a good idea if you don't try it.
So in summary, I think 922(r) is a silly thing, and I get that the probability of getting caught cheating is low. But I really do not want to go to Federal Prison. So if you REALLY want to have a 7 round tube badly enough, I recommend spending a few dollars more to comply with the silly law. If you can't afford the parts, just leave it as a 5 round tube.
Now, addressing the question that the OP really asked: I think my parts will offer a slight benefit over the factory option, as discussed, though I admit I have not tested any other US made parts. I do not agree with the posts that are all doom & gloom about replacing parts in the FCG. Most people can handle swapping out a part, and the worst that can happen is that you shoot the hammer spring across the room and have to spend time on your hands & knees searching. Plus, you need to invest in a good set of C-clip pliers.
-
Ha! I'm glad to hear that. I got up to prototype #7. I thought I did a decent job mirroring the factory design, but I noticed I could get it to follow occasionally. I assumed I had screwed up, because no way would factory hammers follow .... So this vindicates me.
Yes, I fixed the following issue. I also fixed that sometimes if you cock it with your finger off the trigger, the hammer would sometimes stick on the trigger without fully engaging the sear, so you had to touch the trigger to get it to pop into proper engagement.
-
1
-
WTB Field Stock
in Benelli
Posted
I'm looking for a spare pistol grip stock to modify, so once you do find your field stock, let me know.