Leaderboard

Popular Content
Showing content with the highest reputation on 01/28/22 in Posts
-
For now, this is just an initial review since I just got the rail in this evening. I'll list the issues I see with it and some of the positive attributes. At this point, I don't know if I like it or not, and if I can make it function for my intended purpose. All of the secondary spare parts have not come in yet from other retailers. Cons. 1. The rail is a pain in the ass to install. I assume it'll get easier with more exposure, but it's kind of retarded and not intuitive at all. I read the supplied instructions like five times and thought I might be retarded since most of it just seemed to be an assembly of big words that made no sense. When the manufacturer is claiming to line up such and such flange, they should probably build a diagram indicating what exactly they're calling the flange. 2. This thing has a lot of wiggle in it. With moderate hand pressure, you can push the rail enough to make contact with the barrel. You'd have a bad time trying to zero a laser in on this thing. Part of the wiggle is that you're compressing the polymer caps that fit into the barrel hanger. Other flex is the fact that you're just flexing 6061 aluminum. 3. This thing is super smooth and hard to hold onto. Expect to add some kind of rail covers to build some traction. 4. This rail did not want to fit over the Briley carbon fiber magazine tube. It seemed to be hanging up around the barrel hanger. I had to motivate the barrel/rail assembly over the magazine tube by lightly mortaring the buttstock on the desk to force the magazine thru. This is likely the fault of that stepped design of the Briley carbon fiber tube. Pros. 1. The weight is a lot less than anticipated. I weighed the rail and its polymer end caps and got 11.5 ounces. The OEM forend is approximately 5 ounces for comparison. 2. Ergonomics are pretty good. Having the 15" rail gives you a lot more options for hand placement. If you shoot with your support arm more forward on AR type rifles, this will feel a lot more intuitive and comfortable. 3. The primary purpose I see for this rail is getting a light pushed out to the muzzle to eliminate barrel shadowing and light blow back off of the barrel and front sight assembly. In minimial outdoor testing, this worked great. The only issue is now how I want to use the switch. If you hand hands forward, its quite easy to reach the activator button on the back of the light. Routing a tape switch rearward is also an option. I'm still waiting on a few options to arrive in the mail to see if they'll work. I'm mainly interested in trying the Unity Tactical Hot Button. 4. Switching to a MLOK front sling mount is an improvement. You have quite a bit of mounting options and the ability to use angled QD sockets which really improve sling comfort. 5. MLOK mounting is much easier than the Agency Arms rail. No modifications were needed to any of the MLOK mounting hardware for clearance with the gas pistons. I've rough tested the light at 3, 6 and 9 o'clock. 9 o'clock works well if you're using a regular Z68 type tailcap. You're still going to risk jamming your thumb though. 3 o'clock works well for using the tape switch. 6 o'clock works, but may interfere with hand placement. Note on my railscales placement, I spanned the gap in the center of the rail that doesn't have an MLOK socket. This was helpful in making a continuous griping surface. I'll probably move to an offset MLOK light mount if I keep this setup as is. Moving it high to a 1:30 - 2:00 o'clock position will clean up the package so that the light isn't sticking out the side so far.2 points
-
It’s a titanium choke from Briley. It’s a fraction of an ounce lighter than the oem and cannot rust. The oem chokes are prone to rusting at the threads if not cared for well even in Arizona. It’s the only area I’ve experienced corrosion on the Benelli M4.2 points
-
The OEM choke on the left was cleaned up as best as I could with wire brushes to remove the rust. You can see the discoloration near the top of the choke and there was a lot of rust inside the threads. This rust was also inside the threads of the barrel. The choke on the right is an OEM choke that I had sent out for NP3 plating thru Robar years ago.1 point
-
Thank you for your input. I’m recently stationed in Arlington, and have seen that quantico has a nice range that’s not too far. I see what you mean about instilling confidence in the weapon. I also think that some people would rather buy a brand new gun than one that’s had rounds put through it, and since I have no intention of keeping it I’d like to keep it new.1 point
-
What choke is that? And what does it bring to the table?1 point
-
Your Bolt Head is clogged with debris, not allowing the firing pin to travel through the bolt head freely. Part 42. Please PM if you would like
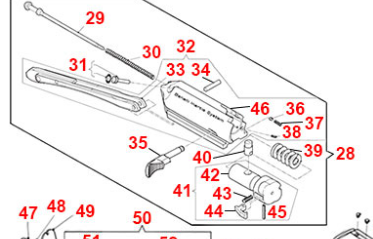 1 point
 -
Question: Is it easy to take the barrel off with the rail installed?1 point
-
Get custom silicone plugs. I’ve had a set for years and they give me 37dB sound isolation. At $100, great when you don’t need to worry about hearing others. Because they’re molded to your ear, there’s no pressure. I also have a set of Harris F-12 HPI (26dB)… cost as much as a kitted M4 but I won’t compromise on my hearing. I really want a set of 20s for BT but at 2x the cost of a M4, but same 26dB as my F-12, not worth it. Plugs are nice because they never interfere with cheek weld. I use IEMs to listen to music so love IEs. There are times where headsets are more convenient and cheek weld is more like chin weld so I use Ops Core AMP. The NFMI plugs are awesome with the AMPs.1 point


This leaderboard is set to New York/GMT-04:00